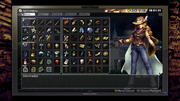
The item screen showing all sub-weapons
Sub-Weapons are items which can be equipped alongside your Main Weapon. These are often projectiles which have unique attack patterns, useful for reaching enemies in tough spots, fighting Guardians, and in some cases are necessary to break walls/objects. Most Sub-Weapons rely on Ammo and can only be used if the player has enough ammunition in stock. Sub-Weapons can be enhanced by the Ring.
(To-do: List specific enemies which can be farmed for each type of ammo, and add any known pots/chests containing ammo)
List of Sub-Weapons
Shuriken
- Location: Roots of Yggdrasil (B-3) - Destroy the gray wall at the bottom of the screen, then place a weight on the pedestal to reveal the Shuriken.
- Use: Shuriken fly in a straight-line across the screen until hitting something. Three can be fired at a time. Useful to quickly open a chest across the room when speedrunning.
- In-Game Description: Weapons said to have been used by Japanese ninjas. Can be thrown in quick succession.
- Deals 1 damage (2 with the Ring).
- Max capacity: 200
- Shops:
- Village of Departure (E-4) 10 for 10 Coins
- Roots of Yggdrasil (C-5) 10 for 10 Coins
- Divine Fortress (B-5) 10 for 10 Coins
- Gate of the Dead (B-3) 10 for 10 Coins
Dropped by __ enemies.
Rolling Shuriken
- Location: Annwfn (D-2) - Push the block onto the switch.
- Use: Rolling Shurikens arc forward slightly onto the ground, then travel horizontally along the floor. They will fall off platforms and continue to roll until making contact with a wall or enemy. Two can be fired at a time. Up to 100 can be held. Useful in "combing" the floor for breakable tiles.
- In-Game Description: Shurikens that roll along the ground. They tear through enemies as they roll. Their weight allows them to trigger floor switches.
- Deals 2 damage (3 damage with the Ring).
- Shops:
- Annwfn (E-1) 10 for 10 Coins
Dropped by __ enemies.
Earth Spear
- Location: Immortal Battlefield (C-1) - Push the block onto the switch using the Glove. Climb the ladder it creates and step on the switch to reveal the Earth Spears. Alternatively, use Caltrops on the switch near the tombstone, then exit from the bottom-right and reenter from the upper-right corner.
- Use: they can be thrown straight down, in an upward arc, or in a horizontal arc, passing through walls. Up to 80 can be held.
- In-Game Description: Spears made from a special metal. They fire spear-shaped light through surfaces they pierce
- Deals 3 damage (4 damage with the Ring).
- Shops:
- Immortal Battlefield (E-1) 10 for 20 Coins
- Heaven's Labyrinth (A-3) 10 for 20 Coins
Dropped by __ enemies.
Flare Gun
- Location: Takamagahara Shrine (F-3)
- Use: The Flare Gun fires flares straight up into the air, passing through most floors until making contact with an enemy or object. They will explode automatically after traveling a set distance.
- Max capacity: 50
- In-Game Description: Shoot fireballs straight above after filling the tube with gunpowder.
- Deals 3 damage (4 with the Ring).
- Shops:
- Immortal Battlefield (G-6) 10 for 40 Coins
- Takamagahara Shrine (C-4) 10 for 40 Coins
Dropped by __ enemies.
Bomb
- Location: Eternal Prison - Gloom (C-6) - Summon Herja the Key Fairy at (B-5), then take her with you to (C-6). Break the Life Seal that appears.
- Use: Bombs are thrown forward in an upward arc, or can be rolled along the ground by holding Down while throwing. Bombs will bounce off walls, but explode on contact with a breakable surface, object, enemy, or the ceiling, and the resulting explosion can damage the player if standing too close. Bombs are powerful weapons when used against enemies, and are required to break open many secret walls. Only one can be thrown at a time, and another cannot be thrown until the previous one has exploded. Can hit an enemy 4 times with one explosion. Up to 30 can be carried.
- In-Game Description: The bomb's powerful blast sure does pack a punch! Careful though, as it will damage the professor as well.
- Each set of 4 blasts can deal about 10 damage, more with the ring. (More testing needed, I'm getting some weird results. Could be that the blasts deal different amounts of damage. Invincibility period doesn't seem to be a factor but can't rule it out completely yet.)
- Shops:
- Icefire Treetop (C-4) 5 for 100 Coins
- Shrine of Frost Giants (A-5) 5 for 100 Coins
Dropped by __ enemies.
Chakram
- Location: Immortal Battlefield (I-6) - Break the Life Seal and use the Gale Fibula to reveal a switch in the inaccessible floor. Hit the switch using an Earth Spear and work your way up to the top of the room. Throw a Rolling Shuriken across the ground and step on the upper floor switch simultaneously as the Rolling Shuriken hits the lower switch.
- Use: The Chakram is a powerful boomerang-type weapon which fires forward and floats up/down relative to the player. It will ricochet off walls, objects, and enemies after making contact, and then float back toward the player. If it hits a wall on return, it will fall to the ground to be picked up again, or you can catch it in mid-air to return it to your stock. It is possible for Chakrams to be permanently lost off-screen. Only one can be thrown at a time. Up to 12 can be carried.
NOTE: Chakrams can be destroyed on hitting enemies that aren't killed on contact (unsure if this is a bug; please confirm).
- In-Game Description: Weapons that return after being thrown. Catch them on their return to retain ammo.
- Deals 4 damage (6 damage with the Ring).
- Shops:
- Hall of Malice (G-4) 1 for 50 Coins
Caltrop
- Location: Valhalla (C-4) - Duck-walk toward the death-trap laser. It will stop shooting, so that you can place a weight on the dais to reveal the Caltrops.
- Use: Several Caltrops are thrown behind the player on the floor, causing damage to anything that passes over them - including the player. They last for a fixed duration before disappearing. It is possible to exploit this form of self-damage to avoid taking larger amounts of damage from other sources. Two handfuls can be dropped at a time, and more cannot be used until the rest have disappeared. Up to 80 can be carried.
- In-Game Description: A weapon that scatters behind you. Enemies that step on the scattered pieces take damage
- 2 caltrops are thrown, deals 1 damage per caltrop. With the Ring, 3 caltrops are thrown, deals 2 damage per caltrop. Lumisa takes the same amount damage.
- Shops:
- Icefire Treetop (A-1) 10 for 30 Coins
- Valhalla (D-4) 10 for 30 Coins
- Ancient Chaos (C-6) 10 for 30 Coins
Dropped by __ enemies.
Pistol
- Location: Village of Departure (E-4) - Buy from the shop for 200 Coins.
- Use: The Pistol fires extremely fast single shots across the room, causing high damage to enemies. The Pistol holds 6 bullets (represented by the right number) and can only be reloaded with purchased Boxes of Ammunition (represented by the left number). Due to the high power of this sub-weapon, ammo is prohibitively expensive and cannot be found anywhere outside of shops. No limit to firing speed. Up to 3 boxes of ammunition can be carried.
- In-Game Description: The end-all in sub weapons, it has superior destructive power.
- Deals 16 damage. The Ring does not make it deal more damage.
Box of Ammunition
- Use: This is an item specific to the Pistol which can only be purchased in shops. Each Box of Ammunition purchased contains 6 rounds for the Pistol and is displayed as the left number (e.g. A Pistol with 2:6 ammo would have 6 shots loaded and 2 boxes of 6 shots for reloading, 18 shots total).
- Up to 3 can be carried, in addition to up to 6 bullets in the gun, for a total of 24 shots total.
- Shops (Note this is 1 box only):
- Village of Departure (E-4) 1:6 for 500 Coins
- Dark Star Lord's Mausoleum (C-2) 1:6 for 400 Coins
Buckler
- Location: Village of Departure (E-4) - Buy from the shop for 10 coins.
- Use: Press the sub-weapon button to hold out your shield. It will absorb a set number of enemy projectiles before breaking, after which a new one must be purchased. Reequipping the shield resets how much health it has.
- In-Game Description: A small shield that can block projectiles from enemies. May break if used to block too many attacks.
Silver Shield
- Location: Annwfn (F-5) - Chant Iorð using the Djed Pillar on the Bust of Mimir.
- Use: Press the sub-weapon button to hold out your shield. It will absorb a set number of projectiles before being knocked away, requiring you to press the sub-weapon button again, but it will not break. Reequipping the shield resets how much health it has. The amount of damage it can take before being knocked back is the same as the amount of damage the buckler can take before breaking.
- In-Game Description: A shield that can block bullets from enemies. May cave under repeated fire, but it won't break.
Angel Shield
- Location: Hall of Malice (G-4) - Buy it from Fairylan for 1000 Coins.
- Use: Press the sub-weapon button to hold out your shield. It will absorb more powerful attacks from enemies than the Silver Shield and cannot be knocked away.
- In-Game Description: A shield that can block bullets from almost all enemies.
Ankh Jewel
- Location: Varies, please refer to individual field maps.
- Use: Ankh Jewels are used to summon an area's Guardian at their corresponding Ankh. Note that while each area has one ankh and one ankh jewel, any ankh jewel can be used to summon any Guardian. Can also be used a weak weapon as one can thrust above, sometimes through thin platforms above.
- In-Game Description: A jewel that can destroy the Ankhs, in which the souls of Guardians slumber.
