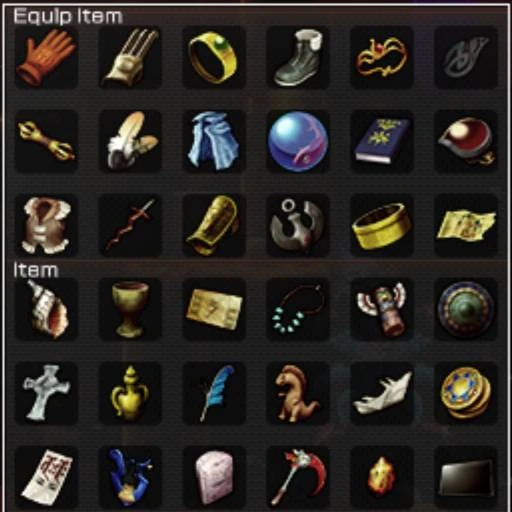
The Item menu showing all available treasures
Treasures are important items which provide a wide variety of beneficial passive and active effects to the player. Many of these are required to progress through the game and are typically found in chests, shops, and hidden among puzzles and traps.
Equip Items[ | ]
In La-Mulana 2, certain treasures are now categorized as Equip Items in the Item menu. These items can be toggled on or off, as opposed to being permanently active.
Glove[ | ]
![]()
- Location: Annwfn (C-4) - Climb the ladder to the right of the block and stand facing left for 5 seconds. Recommended to kill the skeleton from below first.
- Description: Allows you to push blocks around.
- In-Game Description: A glove that can boost upper-body strength. Equip to move blocks.
Grapple Claw[ | ]
![]()
- Location: Icefire Treetop (E-4) - Place a weight on the pedestal.
- Description: Hold Up to cling to walls and press Jump to kick away. Pressing Jump while attached to certain smooth pillars will allow you to swing to the other side.
- In-Game Description: A tool said to have been employed by ninjas. Equip it to latch onto walls.
Ring[ | ]
![]()
- Location: Takamagahara Shrine (B-4) - Bring a Key Fairy to the left side of (B-4), opening a section of wall to reveal a Life Seal. Smash the walls around the room to reach the seal and the chest.
- Description: Sub-weapons can be thrown more rapidly, travel faster, and deal more damage.
- In-Game Description: An accessory thought to have been passed on by a master warrior. Equip it to boost dexterity, improving weapon throwing technique.
Snow Shoes[ | ]
![]()
- Location: Immortal Battlefield (G-3) - Retrieved from Mulbruk after having her check out 3 different locations (talk to her in her tent every now and then).
- NOTE: The above may not be accurate, as Mulbruk will give you the Snow Shoes at a certain point in the game regardless of whether you have asked her to investigate locations or not. The exact trigger for this is unknown.
- Description: Prevents slipping on ice. Works with the Gale Fibula.
- In-Game Description: Shoes that reduce slipping. Wear them to prevent slipping on snow or ice.
Flame Torc[ | ]
![]()
- Location: Icefire Treetop (C-2) - Defeat Surtr, then lift the chest's curse using the Mulana Talisman.
- Description: Adds a flame effect to weapons. This is required to defeat certain invulnerable sub-bosses. Will ignite rooms containing flammable gas. Does not add any damage.
- In-Game Description: A bracelet sealing the power of flame within itself. Equip it to add a fire effect to your weapon.
Gale Fibula[ | ]
![]()
- Location: Immortal Battlefield (B-2) - Drop an Earth Spear on the switch from the top-right of the room. Push the block onto the switch using the Glove. Jump through the invisible wall on the top-left, then jump over the pit trap right next to the chest.
- Description: While equipped, Lumisa will run uncontrollably in the direction pressed until hitting a wall. Required to bypass certain traps. Should be toggled off when not in use.
- In-Game Description: A breast-mounted accessory. The wearer can dash like the wind.
Vajra[ | ]
![]()
- Location: Gate of the Dead (C-7) - Place a weight on the 4th pedestal from the left. Then, either stand in place (don't get knocked back!) or move all the way left or right before the lasers come to kill you. Flip the map after the jingle plays and then open the chest in front of you.
- Might be permanently missable, too? Haven't tested thoroughly.
- Description: Lumisa can perform combo attacks by rapidly pressing the Attack button, greatly increasing the effectiveness of certain weapons.
- In-Game Description: A ritual object used in prayer to a war deity. Wear to become highly proficient with weapons.
Feather[ | ]
![]()
- Location: Dark Star Lord's Mausoleum (A-4) - Attack and destroy the tablet in the lower-left corner of the room to unlock the chest. Defeat Angra Mainyu in the room above using Mjolnir to open a passage leading to the chest.
- Description: Enables double jumping.
- In-Game Description: An accessory used by the 7th Children. Equip it to gain the double jump ability.
- Note: Methods to reach the Feather early have been patched out as of version 1.1.1.2.
Ice Cloak[ | ]
![]()
- Location: Immortal Battlefield (G-5) - From the passage on the left side of the room, throw shurikens across the waterfall to break the wall on the other side, revealing a Life Seal. Break the seal to unlock the chest.
- Description: Dramatically reduces damage taken while in magma. Magma + poison damage is slightly reduced, but still deadly.
- In-Game Description: A frosty cloak of ice. Wear it to negate almost all damage from falling into lava.
Scalesphere[ | ]
![]()
- Location: Valhalla (E-2) - Defeat Vritra.
- Description: Negates poison damage while in water.
- In-Game Description: A crystal within which a phantom fish dwells. Equip it to negate poison damage while in water.
Scriptures[ | ]
![]()
- Location: Ancient Chaos (A-1) - Defeat Anu.
- Description: Confers immunity to bats, causing them to harmlessly pass through Lumisa.
- In-Game Description: A hexed tome with spells that protect ever so slightly against magic. Equip it to nullify damage from bats.
Spaulder[ | ]
![]()
- Location: Eternal Prison - Doom (C-2) - Bring Key Fairy Herja to Eternal Prison - Doom (C-2) and she'll reveal and unlock the chest.
- Description: Adds an after-image effect to weapon strikes, causing them to effectively make another attack with the same strength, doubling the damage. Can occasionally miss for unknown reasons.
- In-Game Description: An armor piece that imbues weapons with holy energy. Equip it to produce damage-dealing shadows with each strike.
Nemean Fur[ | ]
![]()
- Location: Hall of Malice (A-4) - Defeat Nemean Lion at (B-4) to unlock the chest. Jump through the left wall right below the tablet. Place a weight on the left pedestal to lower the pillar (careful not to get crushed!), then cling to the left side of it until it climbs back up to the ceiling. Kick off to reach the chest.
- This method is now more difficult to do as they added spikes (although still possible). The likely intended method is to use the Lamp of Time when the falling pillars are in suitable locations.
- Description: Increases defense, reducing damage taken from all sources to 70%.
- In-Game Description: Sturdy clothes made out of a beasts' pelt. Wear it to reduce damage incurred.
Power Band[ | ]
![]()
- Location: Takamagahara Shrine (A-2) - Defeat Belial, then remove the curse using the Mulana Talisman.
- Description: Lightning emitted by the Mjolnir homes in on enemies. Required to activate the Master Skull.
- In-Game Description: An accessory containing the power of a thunder god. Cannot be used as a weapon. Equip it to make Mjolnir storm energy track enemies.
Gauntlet[ | ]
![]()
- Location: Shrine of the Frost Giants (A-3, Not marked on the map) - Break the ceiling near the top-left at (A-4) to reveal a ladder. Break the Life Seal in the next room.
- Description: Greatly increases weapon attack speed.
- In-Game Description: A piece of armor said to have belonged to a god of martial arts. Wear it to increase weapon attack speed.
Anchor[ | ]
![]()
- Location: Gate of the Dead (B-6) - This block puzzle is missing a block. To get it to appear, you must talk to Brokkr in Divine Fortress (B-3) after speaking to Eitri about Frey's Boat in the same location. Push the block onto the switch to unlock the chest.
- Description: Allows Lumisa to walk along the bottom of any water/magma and against currents. This also allows for interacting with pedestals and other objects along the floor.
- In-Game Description: An anchor cut from a special rock. Repurpose it as a weight to sink effortlessly in water, and stand in the depths.
Bracelet[ | ]
![]()
- Location: Heaven's Labyrinth (A-3) - Purchase from Megarock for 150 coins.
- Description: Allows you to destroy pots in one hit.
- In-Game Description: An accessory that holds some mysterious power. Equip it to be able to smash vases in one strike.
Book of the Dead[ | ]
![]()
- Location: Eternal Prison - Doom (A-3) - Defeat Hel.
- Description: Reduces damage taken from health drain effects.
- In-Game Description: A "book", said to be instrumental in traveling to the world after death. Equip it to reduce the effectiveness of life-sapping attacks.
Items[ | ]
Treasures under the Items category in the Item menu are permanently enabled, typically having minor passive effects or simply being required for progression.
Shell Horn[ | ]
![]()
- Location: Gate of Guidance (D-2) - Place a weight on the pedestal below to unlock the chest.
- Description: Plays short tunes to indicate a successful puzzle solution or a trap being triggered.
- In-Game Description: A large shell fashioned into a horn. Plays a strange melody when you solve mysteries in the ruins.
Holy Grail[ | ]
![]()
- Location: Gate of Guidance (B-4) - Hit the chest from below.
- Description: Allows for the recording of Holy Grail Tablets and warping to them.
- In-Game Description: Can be used to warp to recorded locations. Press the L Bumper (default A for keyboard) on the Pause Screen to use it.
Fairy Guild Pass[ | ]
![]()
- Location: Icefire Treetop (E-1) - Requires Life Sigil to move the statue
- Description: Allows the purchase of Fairies from select stores.
- In-Game Description: A membership card for an undeground[sic] guild that deals in the capture and trade of live fairies.
Freya's Pendant[ | ]
![]()
- Location: Endless Corridor (A-1) - After speaking with Frey and gaining access to the Endless Corridor, talk to Freya.
- Description: Bring this to Frey to enable the use of Fairies. Be warned, if you take too long to talk to Freya, she will move to Annwfn, and you can no longer obtain this item (as of v1.2.2.2)
- In-Game Description: A pendant that belongs to the Fairy Queen, Freya. Proof of having bested the Fairy King's Trial.
Totem Pole[ | ]
![]()
- Location: Immortal Battlefield (D-2) - Jump into the wall on the left at (E-2) to break the Life Sigil at (D-2). Then, make your way around to the top of (D-2) and use the Gale Fibula to dash past the trap. Place a weight on the pedestal above the chest to unlock it.
- Description: Allows you to record Prayer Altars to the Holy Grail.
- In-Game Description: An figurine that amplifies the Holy Grail's power. You can add a prayer altar to the Holy Grail's memory.
Bronze Mirror[ | ]
![]()
- Location: Gate of Guidance (B-4) - Reach the top-right of the map using either the Gale Fibula or the Feather.
- Description: Causes gates in the Eternal Prison to have glowing eyes. Blue eyes indicate a gate leads outside, while green eyes will take you to Ajisukitakahikone.
- In-Game Description: A mirror of polished bronze. It can dispel gates in the ruins. Gates leading out of the underworld will glow blue.
Crucifix[ | ]
![]()
- Location: Dark Star Lord's Mausoleum (C-8) - Defeat Aten-Ra.
- Description: Ghost enemies will be harmlessly dispelled on contact with Lumisa.
- In-Game Description: A ritual item that guards against attacks from vengeful spirits. Grants invulnerability to Ghost-type enemies.
Perfume[ | ]
![]()
- Location: Heaven's Labyrinth (E-2) - Defeat Griffin.
- Description: Allows Lumisa to kill Blue Skeletons. Regular Skeletons can also be killed without collapsing first.
- In-Game Description: A perfume for ritual use that dates back to ancient times. Wear it to become able to fell Blue Skeletons.
Maat's Feather[ | ]
![]()
- Location: Dark Star Lord's Mausoleum (B-7) - You must provide the second solution to the Dark Star Lord's Footprints puzzle as well as slay Ammit to enter this room. Jump on to the left side of the scales while holding zero weights (you can give them all away by speaking to Shennong).
- Description: Required to speak to Anubis.
- In-Game Description: A ritual item used for accessing the Underworld.
Dinosaur Figure[ | ]
![]()
- Location: Immortal Battlefield (F-7) - Destroy the dragon statue at the top-left of the room using the Earth Spear or the Rapier.
- Description: Opens the two Altar Gates in Immortal Battlefield to access Altar.
- In-Game Description: A figure of an ancient, deified animal. Used to prove one's status as a Lokapala.
Frey's Boat[ | ]
![]()
- Location: Divine Fortress (D-3) - Talk to Eitri after reading the tablet in Annwfn (F-2). The boat in the room will automatically fold up, allowing you to collect it.
- Description: Required to fight Kujata.
- In-Game Description: A ship that the Fairy King Frey is said to have had the dwarves build. It's small, collapsible, and portable. Can be deployed as a ship if the need arises.
Codices[ | ]
![]()
- Location: Gate of Guidance (B-4) - Purchase from Hiner for 80 coins.
- Description: Displays a health bar at the top of the screen for Room Guards and Guardians.
- In-Game Description: Pure gold plates inscribed with archaic arcane wisdom. It comprehensively details every monster imaginable, allowing you to see the HP of powerful enemies.
Ganesha's Talisman[ | ]
![]()
- Location: Shrine of the Frost Giants (A-5) - Purchase from Hydlit for 200 coins.
- Description: Increases maximum coins to 2000. Required to purchase the Harp and Angel Shield.
- In-Game Description: A talisman imbued with the power of the god of commerce. Allows for more coins to be carried.
Harp[ | ]
![]()
- Location: Immortal Battlefield (G-6) - Purchase from Hiro Roderick for 1000 coins.
- Description: Bring this to Orpheus to lower the price of Enga Musica to 50 coins and for a hint about Eurydice.
- In-Game Description: A harp said to have belonged to a certain poet. Not particularly well crafted.
Destiny Tablet[ | ]
![]()
- Location: Ancient Chaos (D-2) - Defeat Anzu using the Lamp of Time.
- Description: Required to enter Nibiru.
- In-Game Description: A tablet said prove dominion over All Creation. Those who bear are the ruler of the Sky People by right.
Light Scythe[ | ]
![]()
- Location: Eternal Prison - Doom (E-5) - After finishing Anubis' Trials, enter the bottom door to talk to Osiris. Select the top option in the conversation to receive the item.
- Description: Deliver to Sinmara to summon Surtr's ankh.
- In-Game Description: A scythe said to belong to the wife of a flame giant.
Secret Treasure of Life[ | ]
![]()
- Location: Altar Gate (B-1) - After Opening the Spiral Boat Door and defeating Heimdall in Annwfn, swing on the rope sitting on a high platform near the left within the Altar Gate, taking the warp from Immortal Battlefield (D-3).
- Description: Required to enter Spiral Hell.
- In-Game Description: The power of the La-Mulana ruins in condensed, crystallized form.
Mobile Super X3[ | ]
![]()
- Location: You start with it.
- Description: Now in convenient tablet form!
- In-Game Description: A tough tablet featuring only the adventuring essentials.
Mobile Super X3+[ | ]
![]()
- Location: Heaven's Labyrinth (D-1) - Defeat the four sub-bosses Arachne, Glasya-Labolas, Scylla and Griffin to make the Kosugi tent appear at the top of this room. The item is hidden inside.
- Description: Increases Memory Space to 2000MB and adds a gold finish to the menu frame.
- In-Game Description: A higher-end version of the Mobile Super X3. One of a limited run of ten units masterfully coated in gold.
Special Items[ | ]
These treasures are not shown in the Item menu, instead having permanent effects when collected. There are multiple instances of each throughout the game.
Sacred Orb[ | ]
![]() Sacred Orbs increase your maximum health by 32, also fully restoring your health on pickup. There are a total of 10 Sacred Orbs, one located in each of the Frontside Fields (and one in the Village of Departure), bringing your health to a maximum of 352.
Sacred Orbs increase your maximum health by 32, also fully restoring your health on pickup. There are a total of 10 Sacred Orbs, one located in each of the Frontside Fields (and one in the Village of Departure), bringing your health to a maximum of 352.
Locations:
- Village of Departure (G-3) - Sitting in a pool of water. Requires the Feather to reach.
- Roots of Yggdrasil (E-4) - Step on the floor switch in the middle of the room, near the spikes.
- Annwfn (E-5) - Place a weight on the pedestal to reveal the chest. Break the wall in the upper-left part of the room, then break the Life Sigil to open the chest.
- Immortal Battlefield (F-6) - Break the Life Sigil to open the chest.
- Icefire Treetop (F-4) - Using the Anchor, sink to the bottom of the water near the chest and walk through the spikes to place a weight on the pedestal, opening the chest. Optionally, use the Clay Doll Suit to avoid taking damage from the freezing water.
- Divine Fortress (B-3) - Place weights on the five pedestals to open the chest.
- Shrine of the Frost Giants (C-2) - Hit the hole switch in the upper-left corner of the room to open the chest. Be mindful of the surrounding Mimic Chests.
- Gate of the Dead (B-4) - With the chest oriented right-side up, wait in front of it until it opens.
- Takamagahara Shrine (D-5) - Break open the floor and place a weight on the pedestal to open the chest. Be sure to avoid getting crushed by the elevator.
- Heaven's Labyrinth (C-2) - Place a weight on the lower pedestal to open the chest.
Map[ | ]
![]() Maps are items which, once collected, allow you to view the map of their respective area on the Pause screen with the Yagoo Map Reader application. Note that some fields do not have maps.
Maps are items which, once collected, allow you to view the map of their respective area on the Pause screen with the Yagoo Map Reader application. Note that some fields do not have maps.
Locations:
- Village of Departure and La-Mulana Ruins - Given to you by Nebur or Elder Xelpud.
- Roots of Yggdrasil (E-3) - Place a weight on the pedestal in the center of the room to open the chest.
- Annwfn (E-3) - Place a weight on the pedestal to open the chest.
- Immortal Battlefield (F-2) - Place a weight on the pedestal to open the chest.
- Icefire Treetop (B-2) - Place a weight on the pedestal to open the chest.
- Divine Fortress (D-4) - Place a weight on the pedestal to open the chest.
- Shrine of the Frost Giants (D-5) - Place a weight on the pedestal in the bottom-right corner to open the chest.
- Gate of the Dead (D-3) - Use the Reverse Gates to place a weight on the pedestal and access the opened chest.
- Takamagahara Shrine (D-2) - Place a weight on the left pedestal to open the chest.
- Heaven's Labyrinth (C-5) - Place a weight on the lower-right pedestal to open the chest.
- Valhalla (A-3) - Break the Birth Sigil to open the chest.
- Dark Star Lord's Mausoleum (C-6) - Climb the staircase through the wall to break the Life Sigil, opening the chest.
- Ancient Chaos (B-6) - Break the four pots in the upper-left from below, then break the wall leading into that area. Place a weight on the pedestal to open the chest.
- Hall of Malice (C-1) - Place a weight on the pedestal to open the chest.
- Eternal Prison - Doom (D-5) - Place a weight on the pedestal toward the center of the room to open the chest.
- Eternal Prison - Gloom (E-2) - Climb up the ladder from (E-3), then break the Life Sigil to open the chest.